This page describes the status of the DDPI-MK2 system and its integration with Eyeris.
Contents
- Resources
- Ongoing and Future Tasks
- Instructions for Controlling EyeRIS Machine from Insight Computer
- Eye Tracking Instructions
- I/O and Photodiode Use to Detect Skipped Frames
- Monitor settings
- Common setups and differences from default
- Troubleshooting
- DDPI-MK2 Instructions for Installing/Re-installing Eyeris
- Current repository branches
- DDPI, BitFlow, and System Change Log
- NVIDIA driver information
- video database and early testing
- DDPI+Eyeris integration: early testing
- Hardware
- Testing
- Stereoscope
Resources
02/09/2021: DDPI-MK2 recordings show an 85Hz oscillation of about 4 arcmin. See this dedicated page on the issue: DDPI 85Hz Oscillation Investigation
Saved data and Matlab scripts described below are available in the shared box folder (Box/APLab-Projects/Equipment/DDPI/MK2 or https://rochester.box.com/s/ihwc9wecxpp6yv96mfe3tphmqarw8z24)
- Raw ddpi video files are available on the ddpi-mk2 eyeris machine. Lossless-compression versions are stored on opus: \dDPI\ddpiVideos\1k\
Instructions for turning on & off the cameras and recording ddpi-mk2 videos
Ongoing and Future Tasks
This list was updated on July 29, 2021 by Janis.
- General Tasks
- pinhole protocol (for direct and stereo viewing)
- Eye trace and algorithm quality:
- What is the 85Hz oscillation in the eye traces?
- Algorithm improvements (ongoing)
Instructions for Controlling EyeRIS Machine from Insight Computer
As of March 2022
EyeRIS Machine IP: aplab@128.151.171.124
1. SSH Connection to EyeRIS Machine
Open SSH via MobaXterm. Connect to MK2-X11 via Putty in left Quick access menu. Now you are in the terminal on the EyeRIS Machine. From here, you can activate and deactivate Bitflow, activate the IO driver (aa_start), open NVIDIA settings, etc.
2. Insight
Launch with Eye Icon in task bar or on the desktop. Power on EyeRIS, setup protocols, etc.
3. Stream Camera Eye Video
Run batch script on desktop.
Instructions for remotely building task code
JI: [added Jul 22, 2022] Sometimes remote build doesn't upload the latest files. To guarantee a build of the latest files, delete the experiment from the eyeris plugins folder on the eyeris PC. This can be done through the file explorer in MobaXTerm.
Useful commands for remotely editting files
- Once connected to the eyeris pc, the left sidebar in mobaxterm acts as a file explore. You can double click on files to open them with moba's text editor
- xdg-open opens a text editor. Can be used to check and modify the eyeris_launch.json file which is modified when switching eyeris's monitor.
- Example: xdg-open /home/aplab/eyeris/runtime/eyeris_machine/bin/eyeris_launch.json
- Note that you need to press the actual save button in the editor. ctrl+s does not work.
Eye Tracking Instructions
Turn on Function Generator
(Note that this feature was temporarily disabled in March/April 2022 to improve the physical connections. Updated JI Jun 2022)
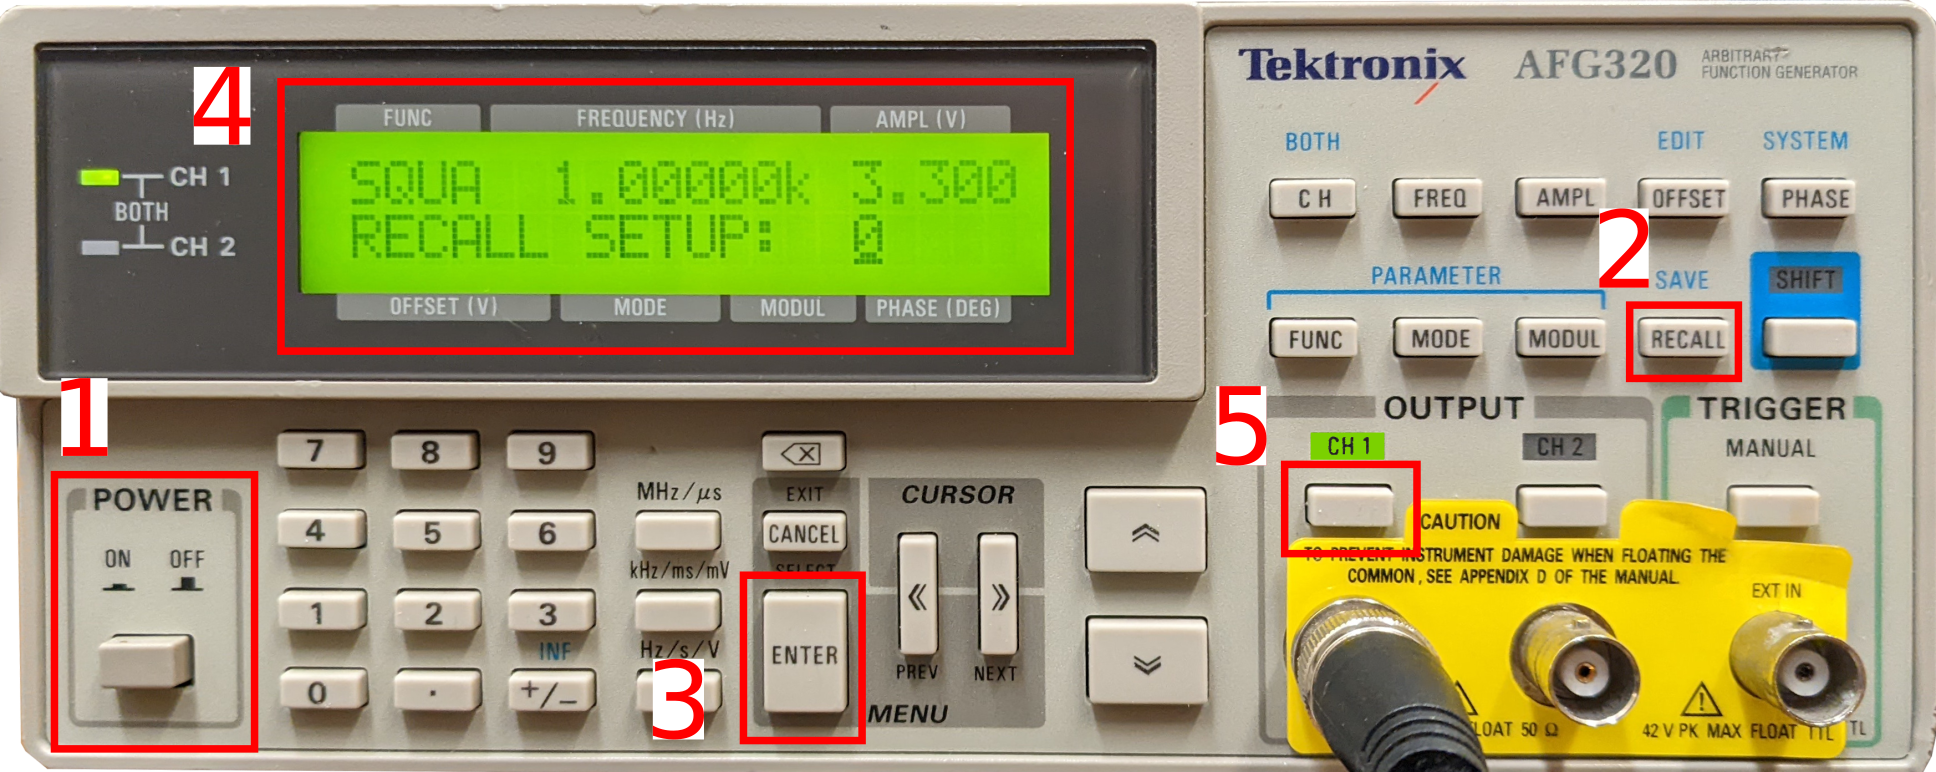
- Turn on POWER.
- Press RECALL : This will recall SETUP 0 and output 1k TTL signal.
- Press ENTER
- Check FUNC = SQUA; FREQUENCY = 1k Hz; AMPL = 3.3 V; OFFSET =TV 1.65V
- Check ONLY CH1 is ON (If not on, press the button)
This procedure will force the camera to capture images at 1kHz (instead of the usual 1016Hz).
Camera Usage
Use the terminal commands to power on and off the cameras: Instructions for turning on & off the cameras and recording ddpi-mk2 videos
Use BitFlowPreview to open a high resolution image of each eye (as of May 11, right eye = channel 0, left eye = channel 4)
Close BitFlowPreview by disconnecting the camera (green button), then closing the window
- Use blue joypad to move stages to approximately position the eye
- Deactivate the cameras after use
[If you do not see any image from the camera in BitFlowPreview, check if the infrared light is on and is set at maximum(full clockwise rotation)]-MVM(30apr2021)
Adjusting Eye Tracking Parameters
As of March 4, 2021, eye tracking parameters (P4 intensity and radius) can be adjusted through Insight (Experiment->Console menu). Note that this communication is one-way: you can send parameters to eyeris but insight does not necessarily show you the current parameters. Do not update the tracking parameters in the bitflow configuration.
The default normalized tracking parameters for each eye are:
- P4 Intensity = 0.5 [range 0-1]
- P4 Radius = 0.5 [range 0-1]
- Use either the arrows to adjust parameters or type values into the text box to update parameters.
- Press SEND at the bottom of Insight to send the new parameters to Eyeris.
- When the parameters are updated, a message will be printed to the main Insight console with current normalized and unnormalized parameters.
In Insight, these parameters are normalized to their respective ranges. The intensity value ranges from 0-255 and the radius from 0-[half the diameter of the downsampled P4 ROI size, or 4]. By default, Insight shows 0.5 for the parameters. The normalization factor for intensity and radius was chosen so that on-average these defaults should provide good tracking.
There is a lock button next to the "Console" title - press this button to lock the UI in place. Do NOT use the other button which reads "Always send all values."
Monocular and Binocular Modes
Updated on April 26, 2021:
BitFlow by default runs in Binocular mode.
- To run your protocol in monocular (right eye) mode: in Insight, add your task to your protocol. The operational mode of your task by default (near the end of the insight configuration) is MONOCULAR. When you run your experiment, you will see the images from both cameras, but only the right camera is tracking and recording. [You can also turn off the infrared light source for the eye that is not being tracked in monocular mode (MVM-30apr2021)].
- To run your protocol in binocular mode: save your protocol file to a text document. Replace every instance of MONOCULAR with BINOCULAR and upload it to insight so that data from both cameras is captured.
- To run your protocol in monocular (left eye) mode: in the configuration for bitflow, change BINOCULAR to LEFT. This assigns the left camera to eye 1. The left eye image will appear in the top half of the eye window. (JI, Apr 2022).
I/O and Photodiode Use to Detect Skipped Frames
- By default, EyeRIS shows a photodiode target stimulus in the top right which changes in luminance every frame (see experiment configuration).
- To monitor this target stimulus with a photodiode, there are 3 steps:
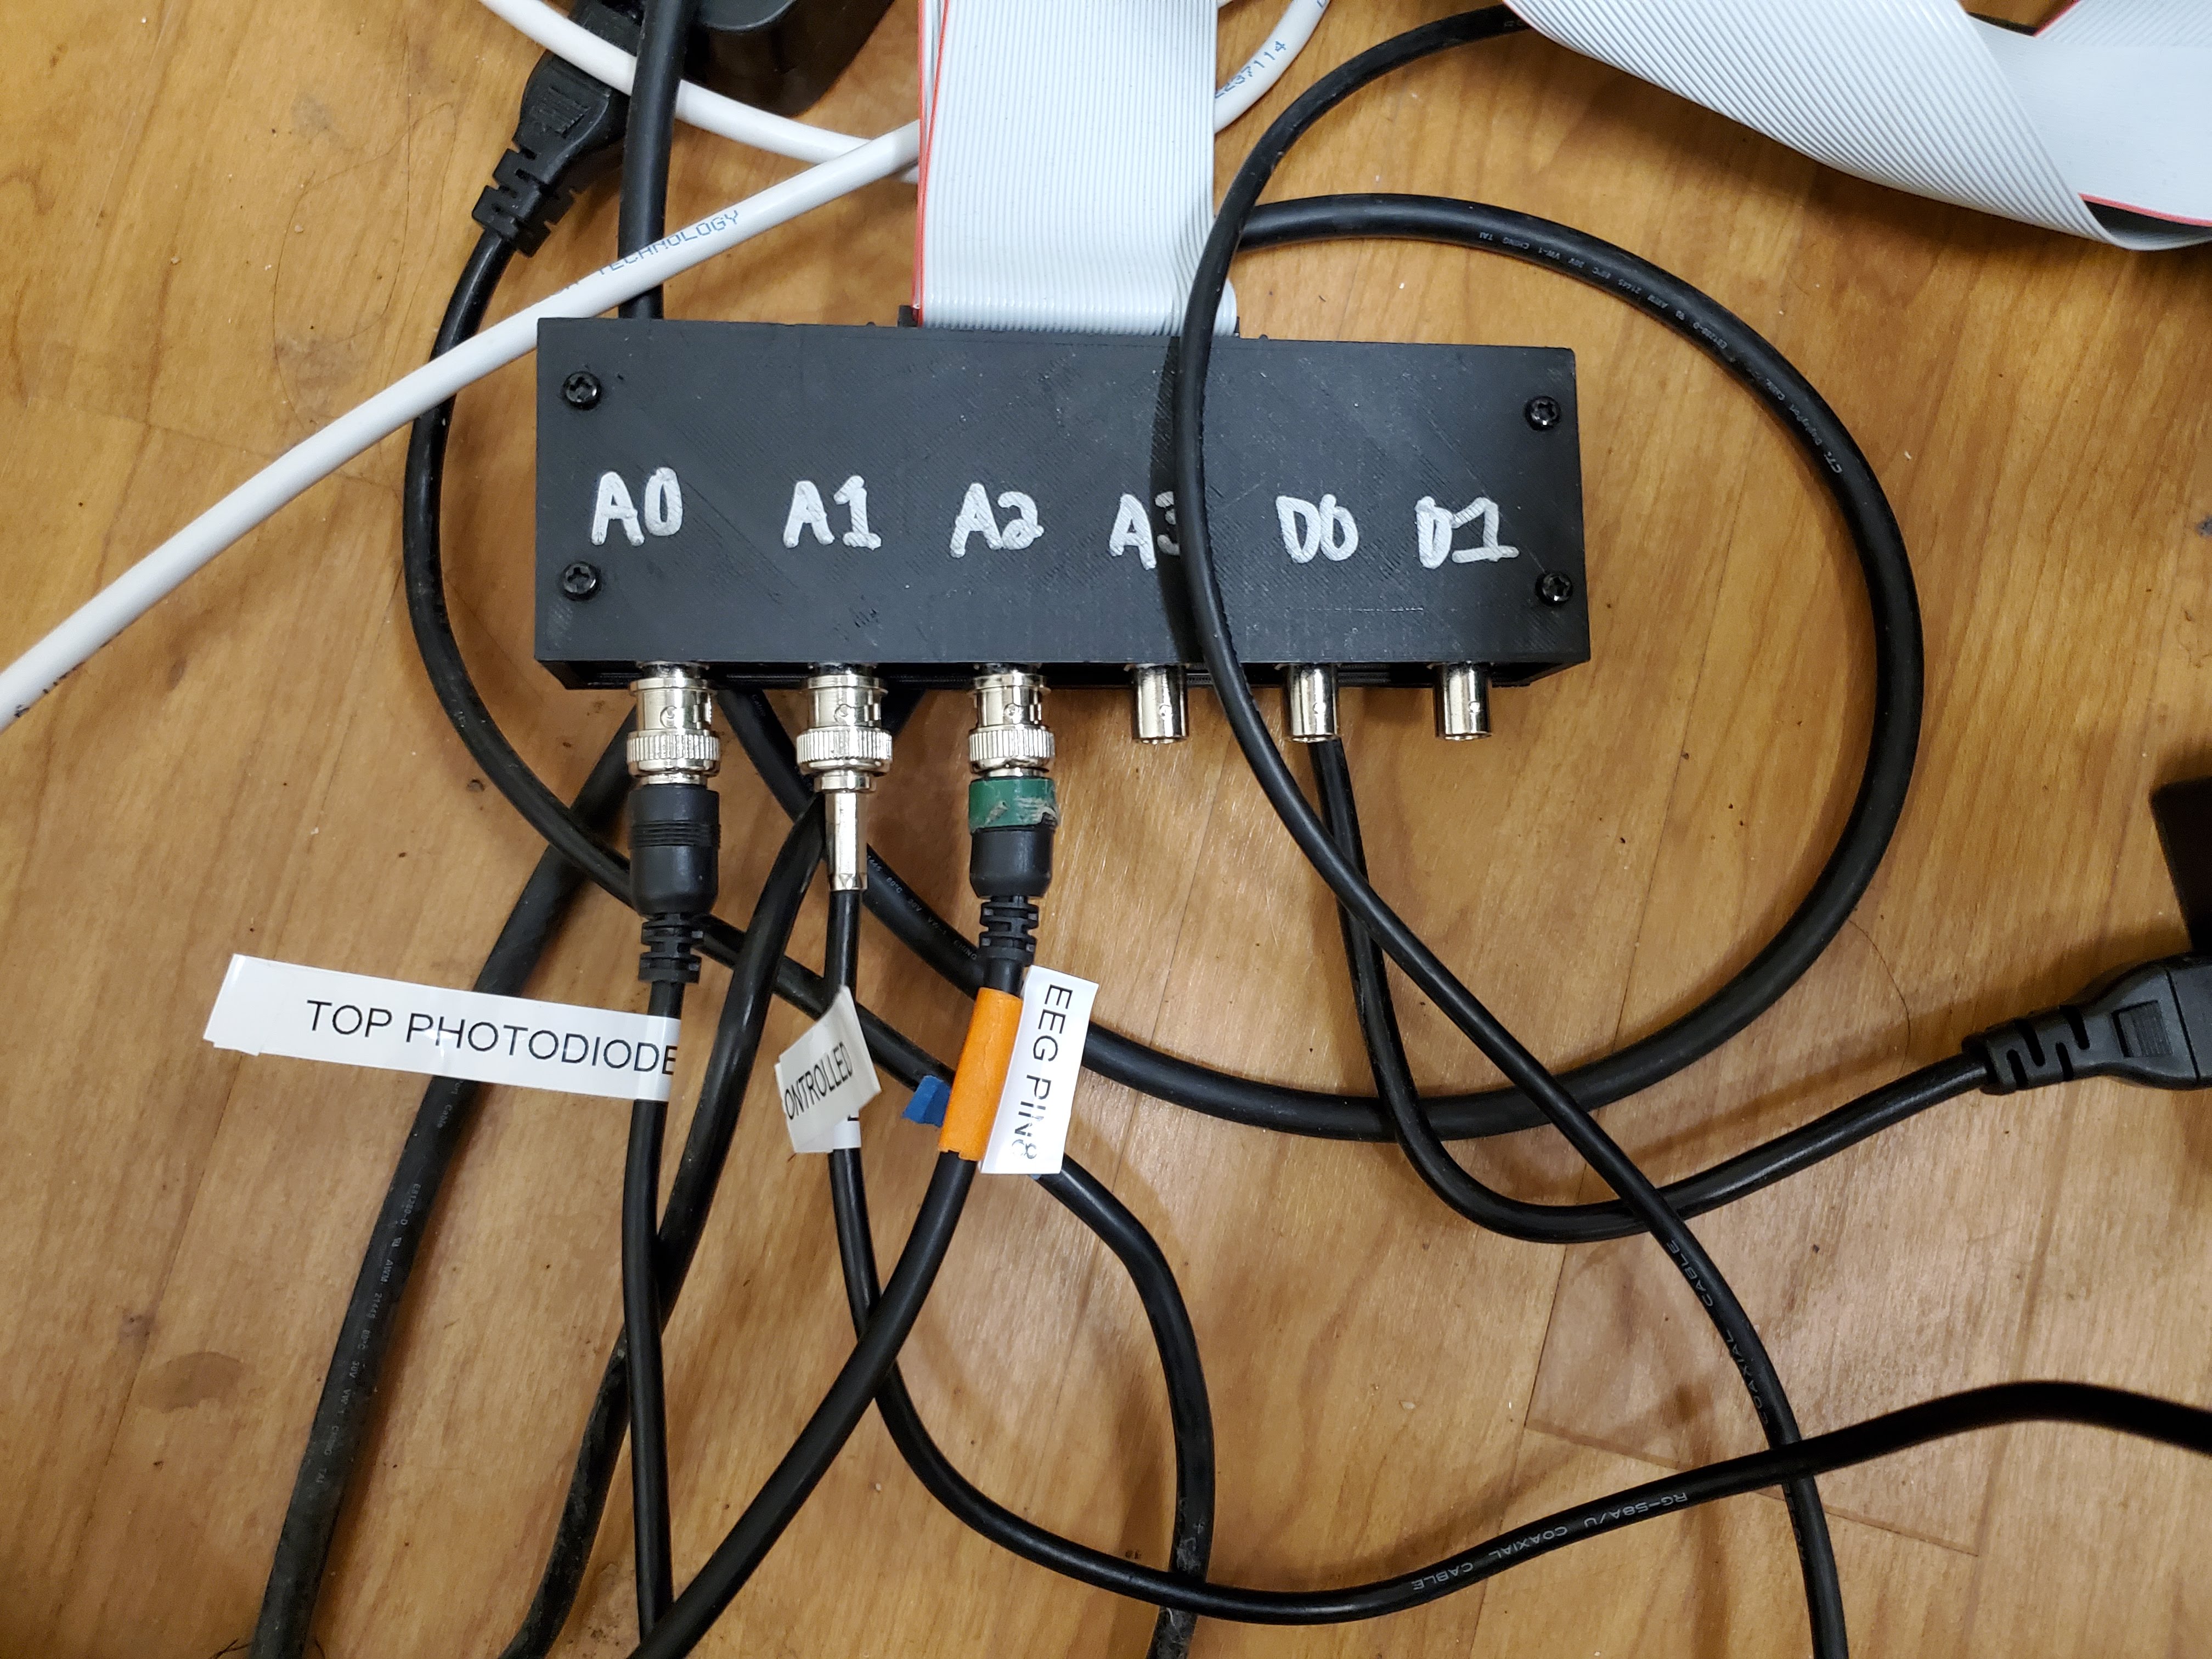
- Confirm the photodiode on the top left of the monitor is connected to the A0 input on the I/O box
- See picture below, which shows the default IO box connections. A0 is the photodiode positioned on the top left of the subject's monitor, used for EyeRIS frame skip detection. A1 is the 2nd photodiode, positioned in the bottom right. A2 is for the EEG.
- Please don't unplug or rearrange any of these connections without talking to other users.
- Activate the driver on the EyeRIS Machine using the command aa_start.
- Set the insight configuration to use the appropriate source.
- Confirm the photodiode on the top left of the monitor is connected to the A0 input on the I/O box
See also https://wiki.bcs.rochester.edu/ApLab/Eyeris-New#EyeRIS_Devices
Monitor settings
- For now, update refresh rate in eyeris_launch.json file.
- Current (Apr 2022) work-around to prevent screen tearing and (most) frame skipping:
In NVIDIA: set PowerMizer for GPU0 to "Prefer Maximum Performance"
- As of Apr 2022, set gamma values in your code (set_gamma())
- (note: set_gamma() is only implemented in mk2 not the debug machine as of 6/15/2022)
- [Archived Apr 2022 for set_gamma() function in eyeris] NVIDIA color settings
- EyeRIS overwrites nvidia settings when powered on.
Therefore, in order to apply color gamma corrections, for example, reopen and check the NVIDIA settings again after eyeris has been powered on.
Approximate linearized ASUS 258 settings were tested and confirmed to be mostly linear in this way Equipment-GamingMonitors/ASUS_258_2021_06_25.pdf
- Once eyeris can communicate with serial power, the linearization parameters can be refined on this system.
- [ADVANCED USERS ONLY] To overwrite default monitor settings, open NVIDIA through terminal with sudo nvidia-settings and Save to X Configuration File
Common setups and differences from default
Default
- 360 Hz Asus monitor (543mm wide by 306mm high)
- ~820cm screen distance
- (optional) photocells for frame drop and other user recording
OLED monitor
hardware & connections:
- change input to DP-0 port: 120 Hz OLED monitor
eyeris & insight configuration:
- modify eyeris_launch.json file
- Insight configuration: modify screen dimensions and distance
- full instructions: Is there documentation somewhere?
- to update eyeris_launch file use eyeris_launch_oled
- manually update monitor distance and display size in Insight
EEG
hardware & connections:
- connect BioSMI usb (yellow tape) to front of eyeris PC
eyeris & insight configuration:
- Insight configuration: modify digital stream source = serial
full instructions: https://gitlab.com/michele.a.cox/stabilized_ssvep_task/-/blob/main/README.md
Stereo
hardware & connections:
- place mirrors and cardboard occluders on optical table
- place cardboard frame on default monitor
eyeris & insight configuration:
- N/A
- full instructions: see Stereo section below
Troubleshooting
Troubleshooting: Cameras (Bitflow)
- for mmap() cannot flash error ((usually a problem with the physical connection)):
Did you try opening BitFlow outside of insight/eyeris? Use BitFlowPreview
- Try powering off then on the cameras: deactivate then activate
- Check the lights at each of the camera cables (PC side and camera side) when the cameras are activated. On the camera side, they should be flickering. On the PC side, then should all be green, not blue.
- Try restarting the computer.
- If there are blue lights even after restarting the computer, gently unplug and replug the cable on the PC side.
- If one side is flashing green lights and the other is not: try jiggling the cables on the side that is NOT flashing and restarting
- for Bitflow Error: Can not create RDMA buffer
- likely that one of the GPUs is not detected by the PC
follow instructions here: https://www.evernote.com/l/AfJ8ltZCOBCu7O85PZjJAZRchBsGt21uMOk/
- bitflow: DMA error. a problem with bitflow's polling rate (JI: Apr 25, 2022)
Troubleshooting: Insight and Eyeris
Insight gets hung up when starting an experiment that you know doesn't have an c++ error. Probably because of one of the sources. The serial source in particular doesn't throw a clean error. Check bitflow since it's often the problem, but if BitFlowPreview is working, then consider your other sources too. -MAC, Jan 2022
- When running from the insight pc, the experiment will appear to start (task timer in insight is running) but no graphics will be updated (the eyeris screen stays blue and no eye window is streamed). Check insight configuration, digital stream source should be "function_generator" instead of "serial" (JI, Apr 2022)
- Insight Configuration: If Insight somehow clears the configuration, you can reset them based on the original configuration (see screenshots of Insight Configuration on the PC desktop).
- Note that the password is the PC's password.
- Note that the latest database IP address is 128.151.171.179 (July 28, 2021)
Troubleshooting: Joypads
- (White joypad wired) If the white white joypad does not seem charged or to connect while plugged in via usb, you may need to replace the usb cable. There are extras on the short white shelf behind the subject.
- Check the responsiveness / calibration of the joypad using the jstest application.
- If the experimenter (blue) joypad is not working follow this procedure: (updated June 16, 2021 by Janis)
- Try restarting the staging system (the power strip under the optical table).
- Try the physical reset button on the Arduino board.
- Reconnect the joypad in the Arduino IDE:
- plug the Arduino into the computer with a USB cable
- Open the Arduino application.
- Open aplab/exp/Ruei/bino_stage_ctrl
- In Tools-Serial Monitor double check that Arduino is connected without error (may need to press down on board to reconnect any loose connections)
Switch to joypad pairing mode: Uncomment line (PS4BT PS4(&Btd, PAIR);) and press the arrow button at the top of the IDE. This should force connect the joypad.
- Press the joypad PS button and share button simultaneously to enter pairing mode
- joypad light should now be blue
Switch to normal joypad mode: Comment out the line uncommented in step 1, and uncomment the line (PS4BT PS4(&Btd);) and rerun the script.
- Wait for a flashing blue light on the green board (where the joypad boards and stage motors are located).
- You should be able to press the PS button again and the joypad should connect now.
- For spurious or odd subject-joypad behaviors, you can use the application jstest-gtk to see how its working and calibrate the joypad.
DDPI-MK2 Instructions for Installing/Re-installing Eyeris
Janis's notes when upgrading the development machine to 18.12.0 : https://www.evernote.com/shard/s498/sh/5219703d-3313-7e68-c946-b9130d808ee1/905ca1fac96b94c21c77a41ae8e053ec
joypad source: there is a known bug in which the button mapping is set then cleared by the source's initialization procedure. See https://jira.santinidesigns.com/browse/EYER-293 for quick fix.
in order for data streaming to work, need to double check and recompile all stages. Checkout the Ruei-beta branch of the stages folder and rebuild.
Current repository branches
Updated April 25, 2022 by Janis:
eyeris: soma/volatile-source link to soma/volatile-source on bitbucket
- insight: master
sources: ddpi_mk2 link to ddpi_mk2 branch on bitbucket
sources_ru: branch bitflow-test
stages: ruei/beta link to ruei/beta branch on bitbucket
system tasks: ??? presumably soma/fix-autocalibration link to soma/fix-autocalibration on bitbucket
DDPI, BitFlow, and System Change Log
June 29, 2022: updated autocalibration (H2) to change background color from configuration (see system_tasks on bitbucket)
May 30, 2022: Changes to analysis of eyeris data by Soma - were there any changes to eyeris code, branches?
April 25, 2022: Reverted change to sources_ru on Apr 21 because smart-search branch did not have optimization for frame-skipping and bitflow timing were not integrated.
April 21, 2022: sources_ru code was switched from branch bitflow-test to branch smart-search
April 18, 2022: Up-down on the left stage was not working. Several components along this path were replaced. We think the black cable was the problem.
week of April 11, 2022: Soma: updated software. ???
April 6, 2022: MAC: Added I/O hardware for a 2nd photodiode and the breakout box on the EEG. A0 is now the top photodiode, used for EyeRIS frame skip detection. A1 is the 2nd photodiode, positioned in the bottom right. A2 is for the EEG. Please don't unplug or rearrange any of these connections without talking to other users.
March 31, 2022: Soma: run without function generator for now until better connections can be established. Soma set the thread priorities of eyeris's main stream and the bitflow stream to "real-time priority" to prevent delays in the eye stream. To prevent freezing: grub parameter, isolate CPUs tells OS scheduler to isolate cores so that nothing (except eyeris) will be scheduled on those cores. Workspace and Bitflow have assigned cores through affinity, grub parameter prevents Mint from assigning other processes to these cores. Possible issues with frame-skipping are emerging
March 19, 2022: The cameras are forced to acquire data at 1kHz via an external trigger from the function generator. This required a change in software settings and additional setup instructions. (Ruei)
March 18, 2022 Soma separated Insight and EyeRIS. Now, there is a stand-alone computer, i.e. Insight Machine, where the experimenter launches Insight and communicates with the EyeRIS Machine in the DDPI MK2 room.
March 9, 2022: RW applied a patch to prevent "freezes"/"spikes" in the eye sample timestamps. sources_ru now on bitflow-test branch
Feb 25, 2022: Monitors switched to 360Hz monitors (SM has shown that 360hz monitor response is about 8ms). Eyeris and nvidia defaults have been changed to 360Hz. 240Hz monitor is still an option for ongoing experiments. (Where is the luminance linearization information for the new monitor?)
Feb 24, 2022: SM fixed a bug in bitflow class that was incompatible with affinity changes. Changes on the sources_ru / left-eye branch? Affinity changes have been re-implemented
Feb 16, 2022: experimenters begin reporting problems with autocalibrations, tracking quality low (this was a problem with 0-insertions into the eye data when affinity was set in eyeris. temporarily reverted affinity changes)
Feb 11, 2022: (need to confirm with SM 2/18) changed affinity for timing reasons. Anything else?
Jan ~17, 2022: bitflow sources_ru switched to left_eye branch
early Jan 2022: (see paper log for exact date) SM applied patch to insight so that database page loads faster and downloads data faster
Jan 6, 2022: Changed eyeris_launch default to a refresh rate of 240Hz
Jan 4, 2022: Updated standard auto and manual calibrations to more stable branches, Eyeris running consistently on volatile_source branch
Nov 30, 2021: Updated system tasks so that autocalibration_h2 has default reaction_delay of 250 samples (see ddpi_mk2 branch of system_tasks). Note that this change has not yet been applied to binocular and stereo autocalibrations (_b2 or stereoscopic autocalibration)
Sept 22, 2021: Eyeris configuration now includes analog and digital stream source for I/O box (insight_configuration_mk2.png) - tests with csmap experiment and eye tracking began on Oct 13
July 28, 2021: Eyeris is now connected to long-term database (IP address ...179 instead of ...252). Instructions to access previous database to save data before it is taken down.
June 28 AM - June 30 3pm, 2021: Remote mongoDB server was temporarily down so eyeris had to run through CLion in dev mode (i.e. probably not real-time)
June 20/21, 2021: JI updated the default joypad axes threshold to 0.1 to minimize false alarms on button presses. Changes exist on the ddpi_mk2 branch of the sources project.
June 16, 2021: LCD is now mounted on sliding rail. Distance to display is about the same as before. RW updated the stage control joypad so that the left eye stage is now controlled by the left side and the right eye stage is controlled by the right side.
June 9, 2021: PJ linked mk2 insight to a temporary remote MongoDB server (and it seems to work!). Link to Janis's notes on how to switch between local and remote database server.
May 15/16, 2021: Back to 1kHz binocular tracking. When tested on May 18 tracking was fine, but the image from the left camera had a much lower gain.
May 11, 2021: Replacement framegrabber has arrived and the two cameras run on different boards - still at 550Hz.
Apri 27, 2021: Switched eyeris to branch ji/stereo_caibrations to include a change to calibration_parameters.hpp file. See changes on bitbucket.
mid-April, 2021: A patch was applied to fix the graphics offset error. Changes are on bitbucket.
April 9, 2021: A BitFlow board broke so both left and right eye trackers are running at 550Hz on a single board. Spectra of data collected April 4, 2021 look the same as before (2021-04-12_JI_PSD-550Hz.png)
February 17, 2021: Ruei has reversed the how tracking is defined by EyeRIS (1 = tracking, 0 = no tracking). Before, it was 0 = tracking, 1 = no tracking.
February 12, 2021: Virtual channel numbers changed for debug data. See history on bitbucket (https://bitbucket.santinidesigns.com/projects/EYER/repos/sources_ru/browse/frame_grabber/bitflow/src/bitflow.cpp).
Before December 2020 - Before EyeRIS Version 18.12 there was no time stamp in eye data.
Data Reading Code to Keep Track of The Changes Above
By MAC -- https://gitlab.com/aplabUR/ddpiJumpSpikes/-/blob/standard_report/Standard_Report/eis_read_ddpi_data.m -- very much so in development
NVIDIA driver information
- CONSULT RUEI OR PAUL before making any changes to NVIDIA drivers
Installing the docker: https://docs.nvidia.com/datacenter/cloud-native/container-toolkit/install-guide.html#docker
video database and early testing
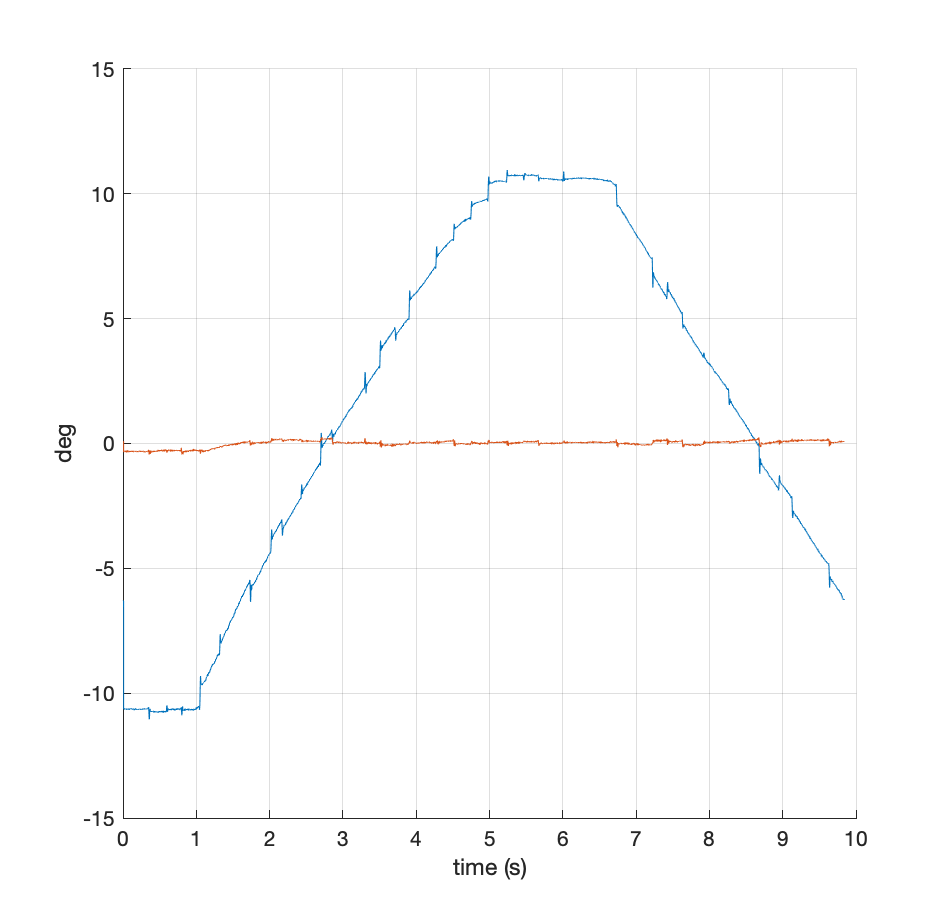
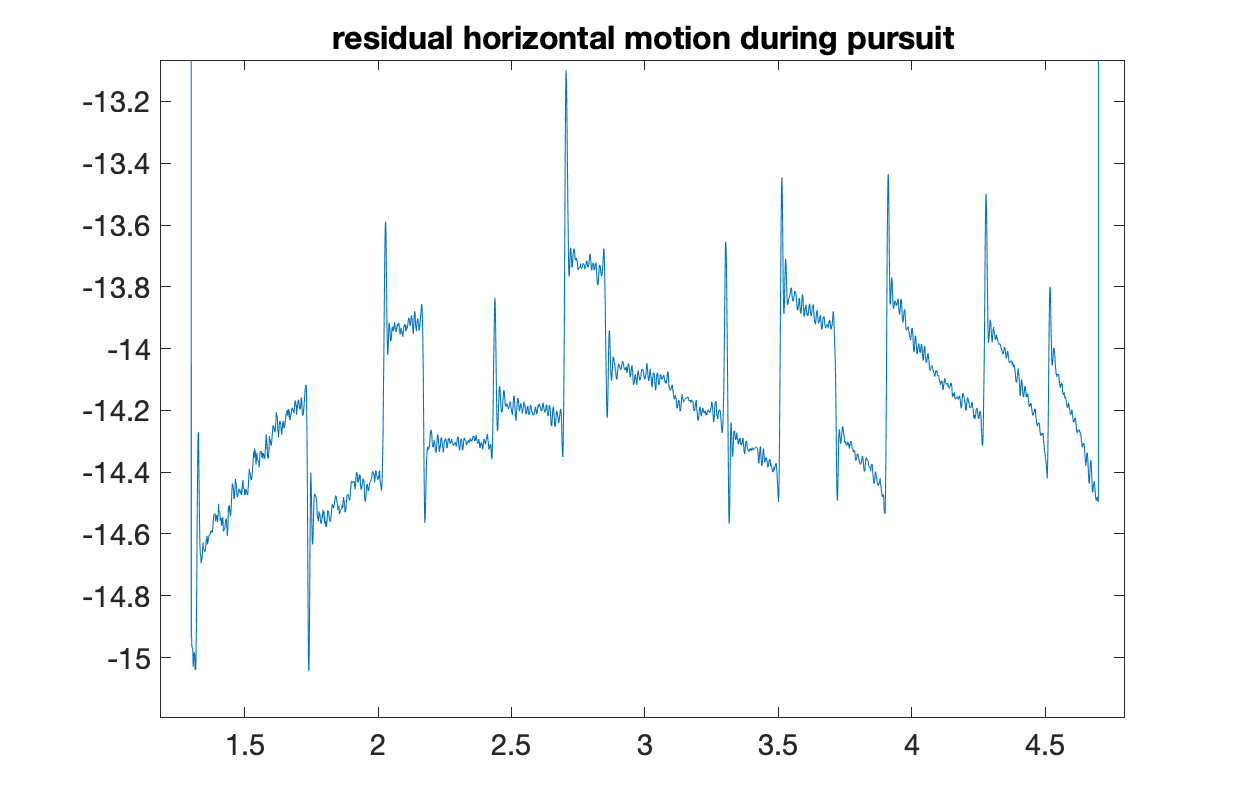
Ruei collected 10s ddpi videos of Janis's eyes during these tasks on Sept 23-24, 2020:
- Horizontal, Vertical, Diagonal cued saccades
- 5 and 10 deg/s smooth pursuit
- Fixation
- Free Viewing
As of September 28, 2020, Bin is analyzing the Smooth Pursuit videos.
Resources
Raw ddpi video files are available on the ddpi-mk2 machine. Lossless-compression versions are stored on opus: \dDPI\ddpiVideos\1k\
Processed eye traces and scripts: https://rochester.box.com/s/e9pwy7sd9luug1ri7ui9d8zncoq4v7yr
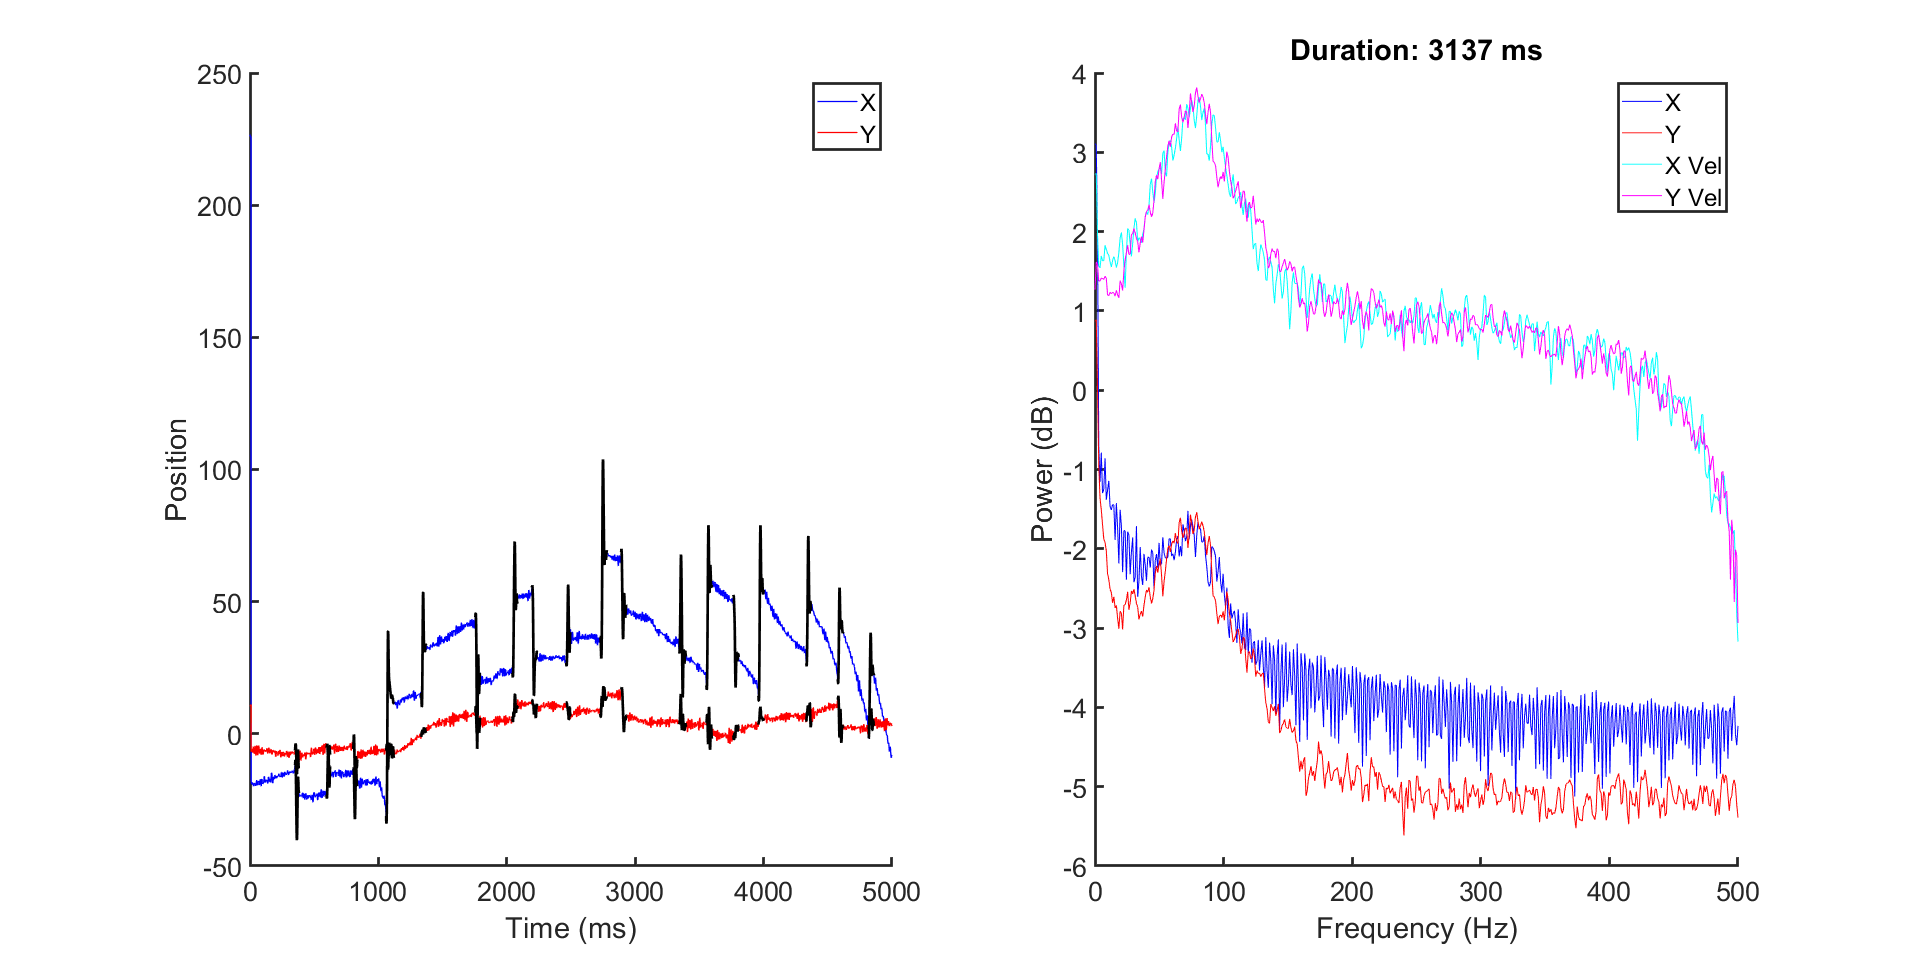
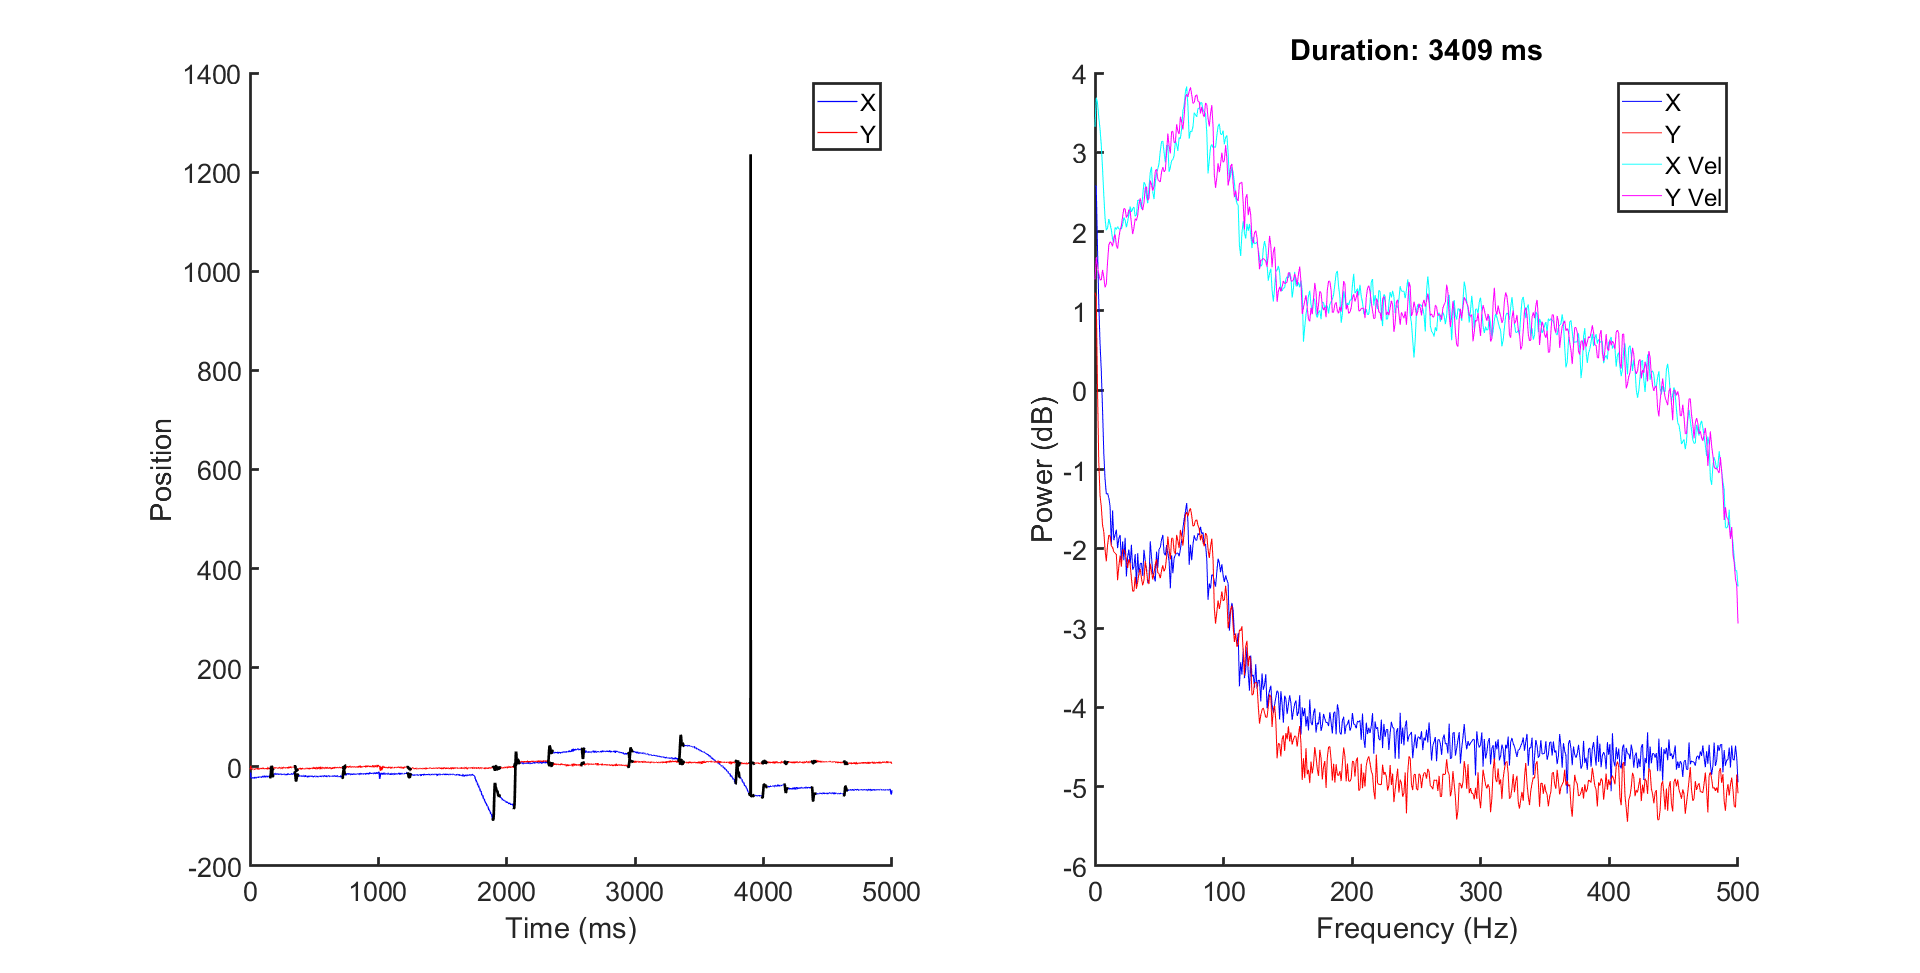
smooth pursuit
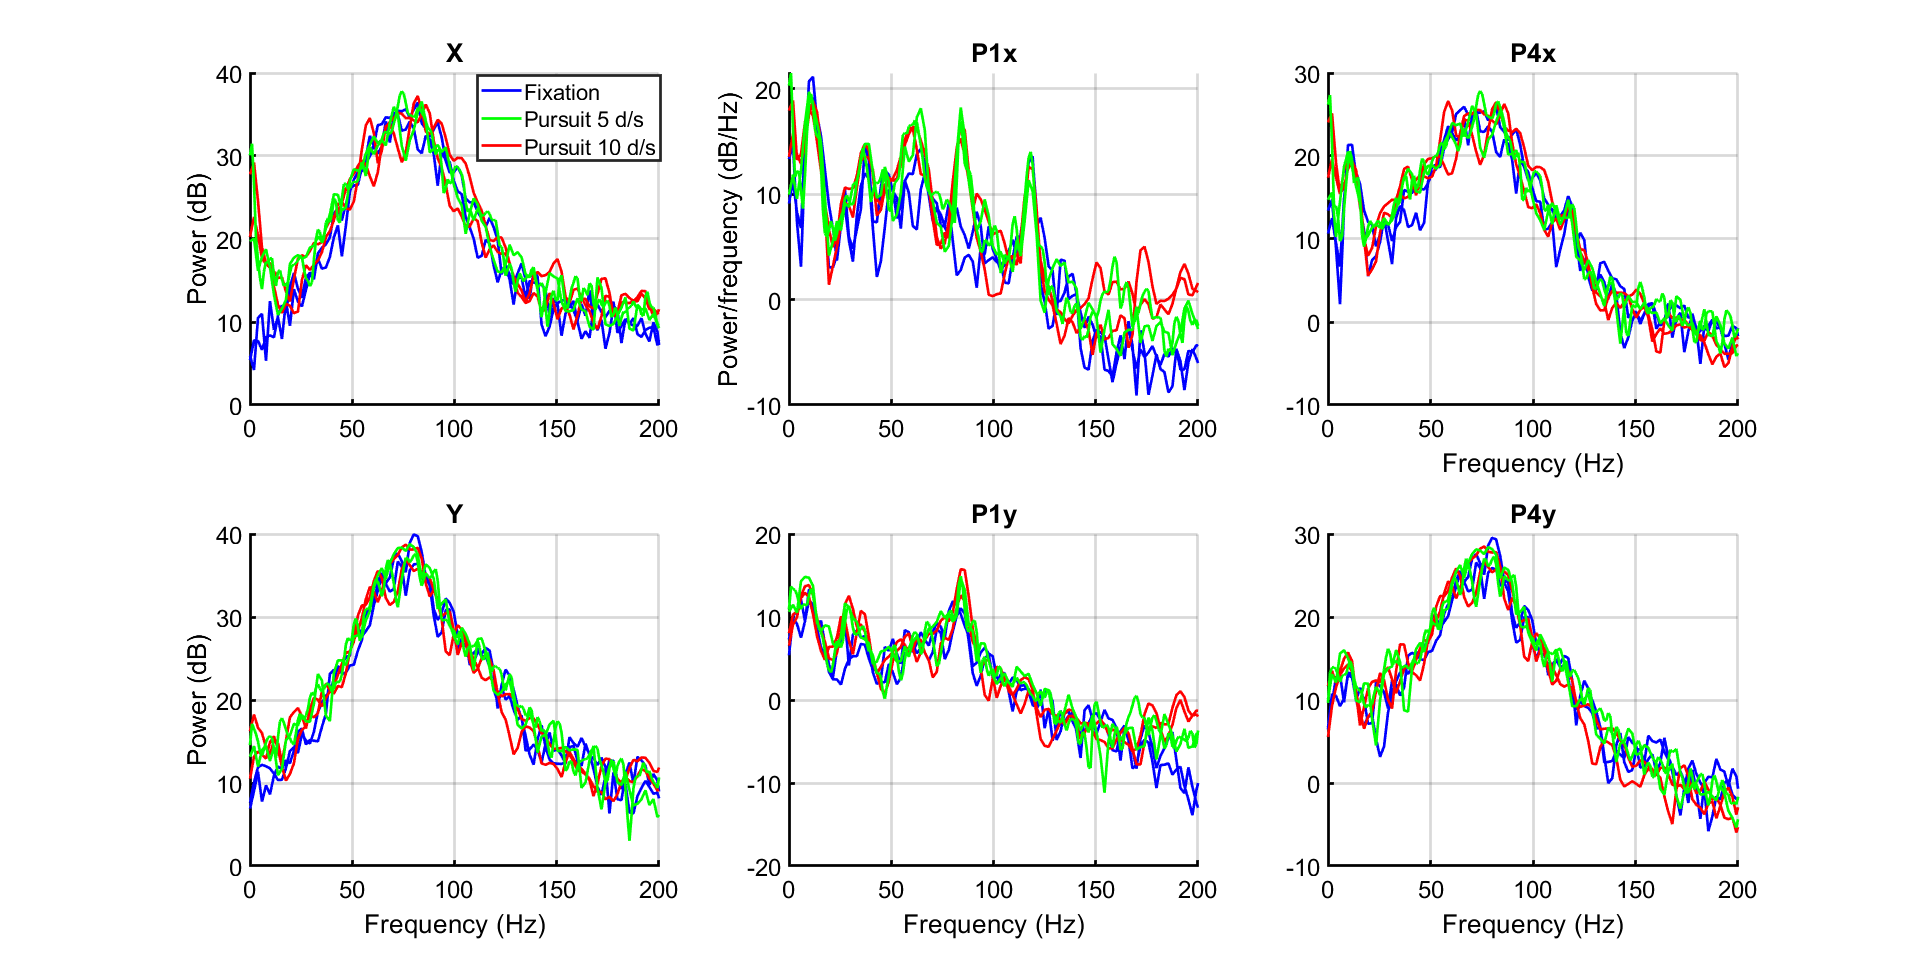
smooth pursuit: PSD analysis
Fixation
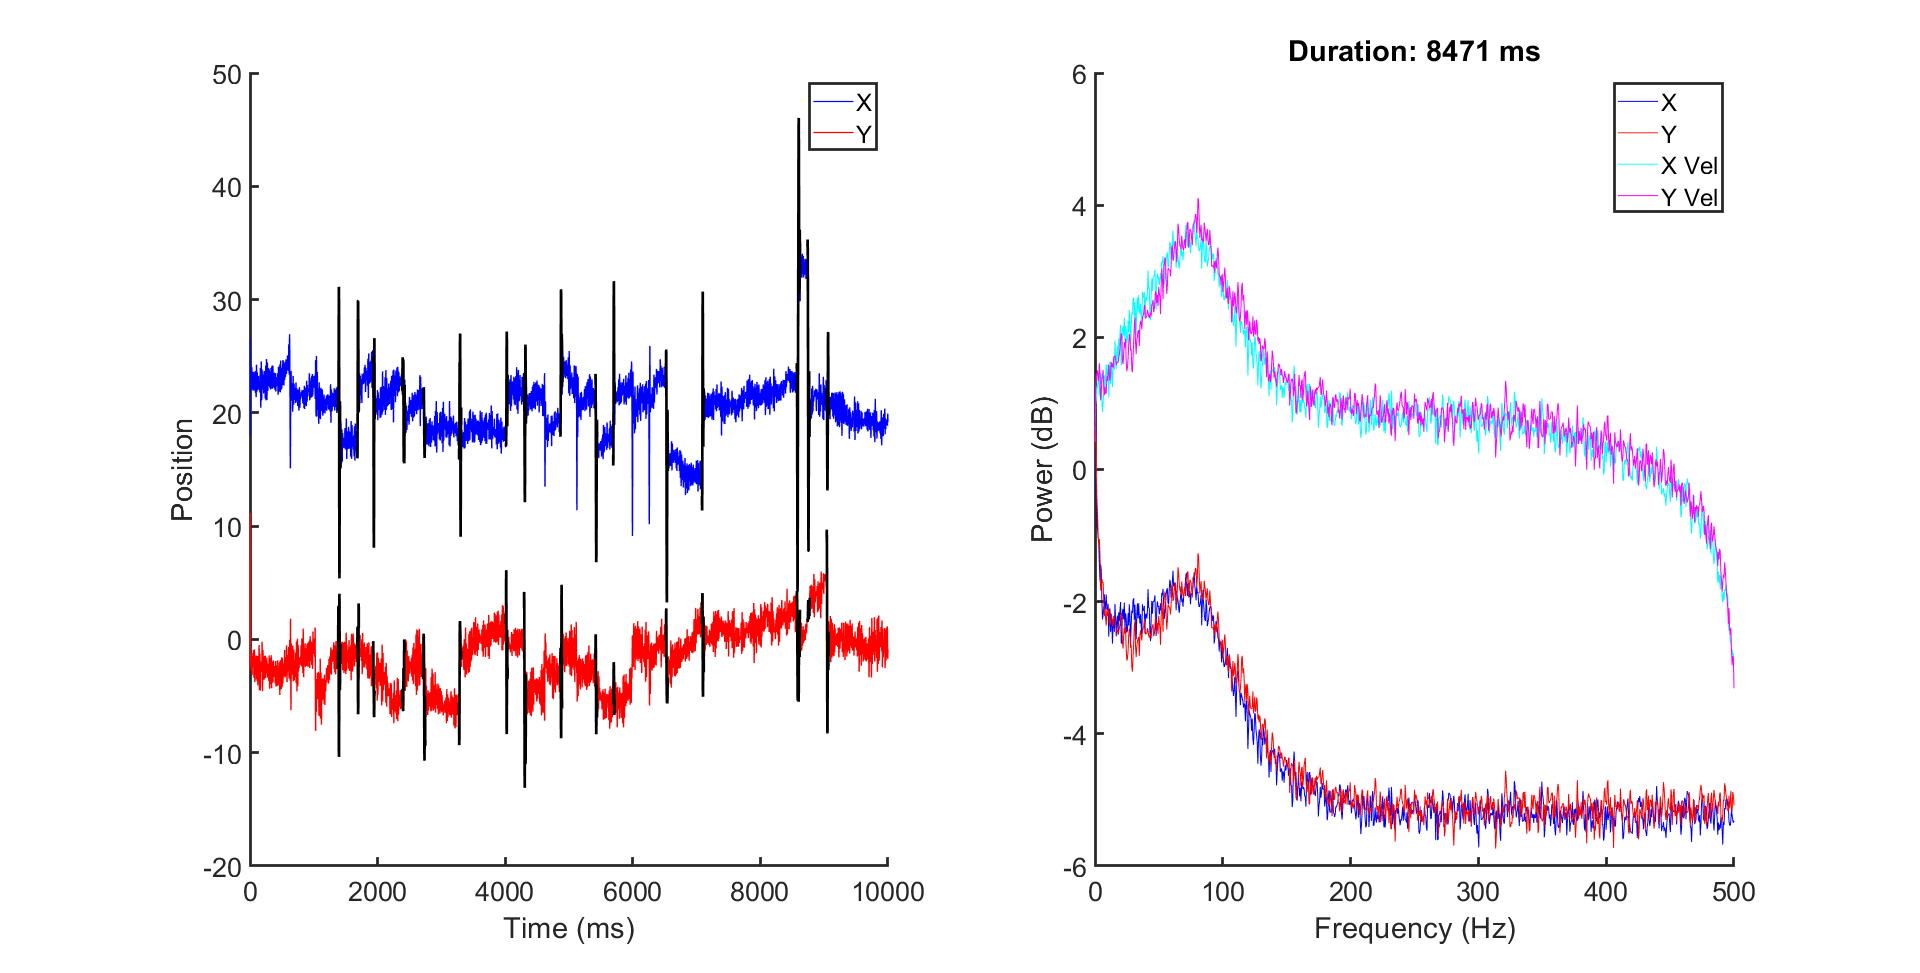
Pursuit at 5 deg/s
Pursuit at 10 deg/s
Comparison between fixation and pursuit
smooth pursuit: P4 video
Ruei: "This is the ROI of p4 during tracking. The red dot is the estimated center by radial symmetry center. The ROI did jump because of low-resolution detection. But the center (red dot) follows the Purkinje image well. If the radial symmetry center algorithm fails, the center will remain at the center of ROI (If the background noise dominates, the symmetrical center is at the center of ROI) which will lead to jumping with the ROI. I believe the 1k camera solves this issue. "
DDPI+Eyeris integration: early testing
(September 18-21, 2020)
Ruei and Janis collected better eye tracking data through Eyeris on a Free View task designed by Janis.
Note that in this version of eyeris, the eye tags (blink and no-track) and eye information (P1, P4) are not saved. The only information available are the raw and calibrated eye traces.
Data and scripts: https://rochester.box.com/s/dhoyxjoyhsi1un51w5cpzzvdtgxvcvyp
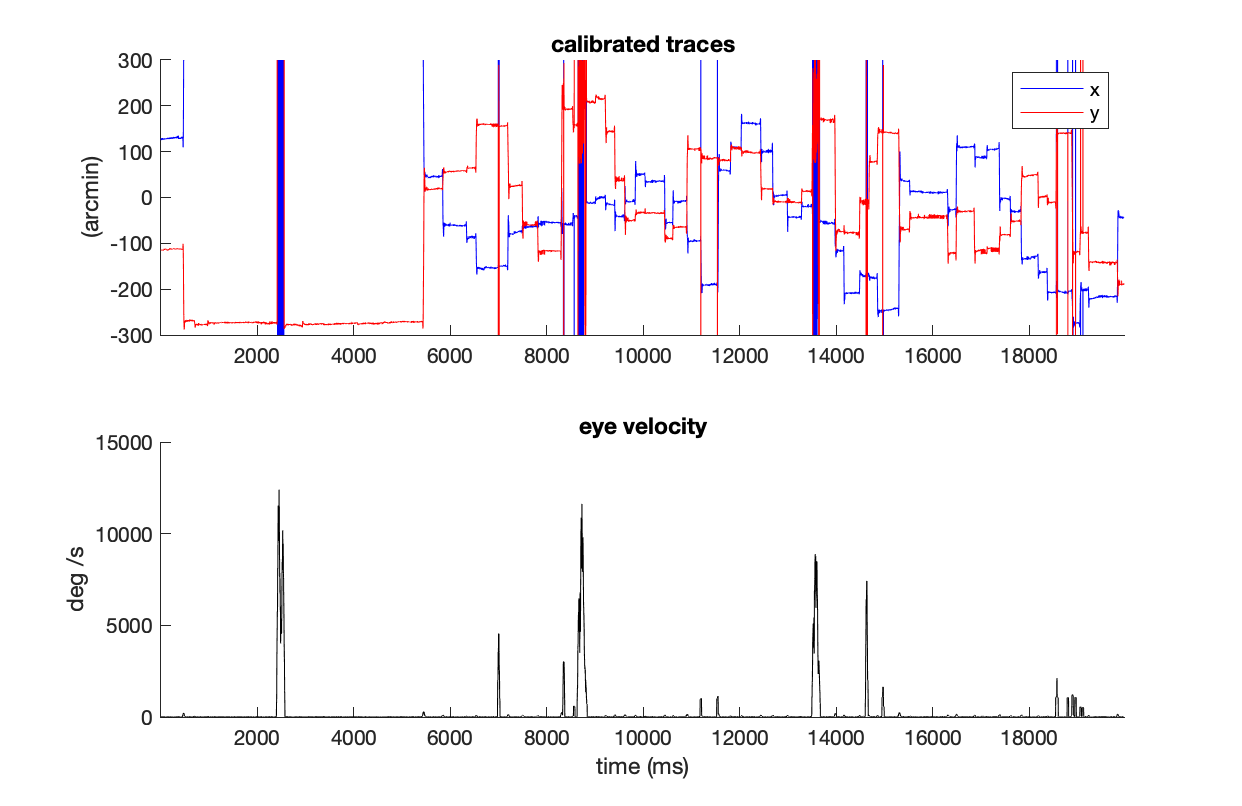
Eye trace during Free Viewing
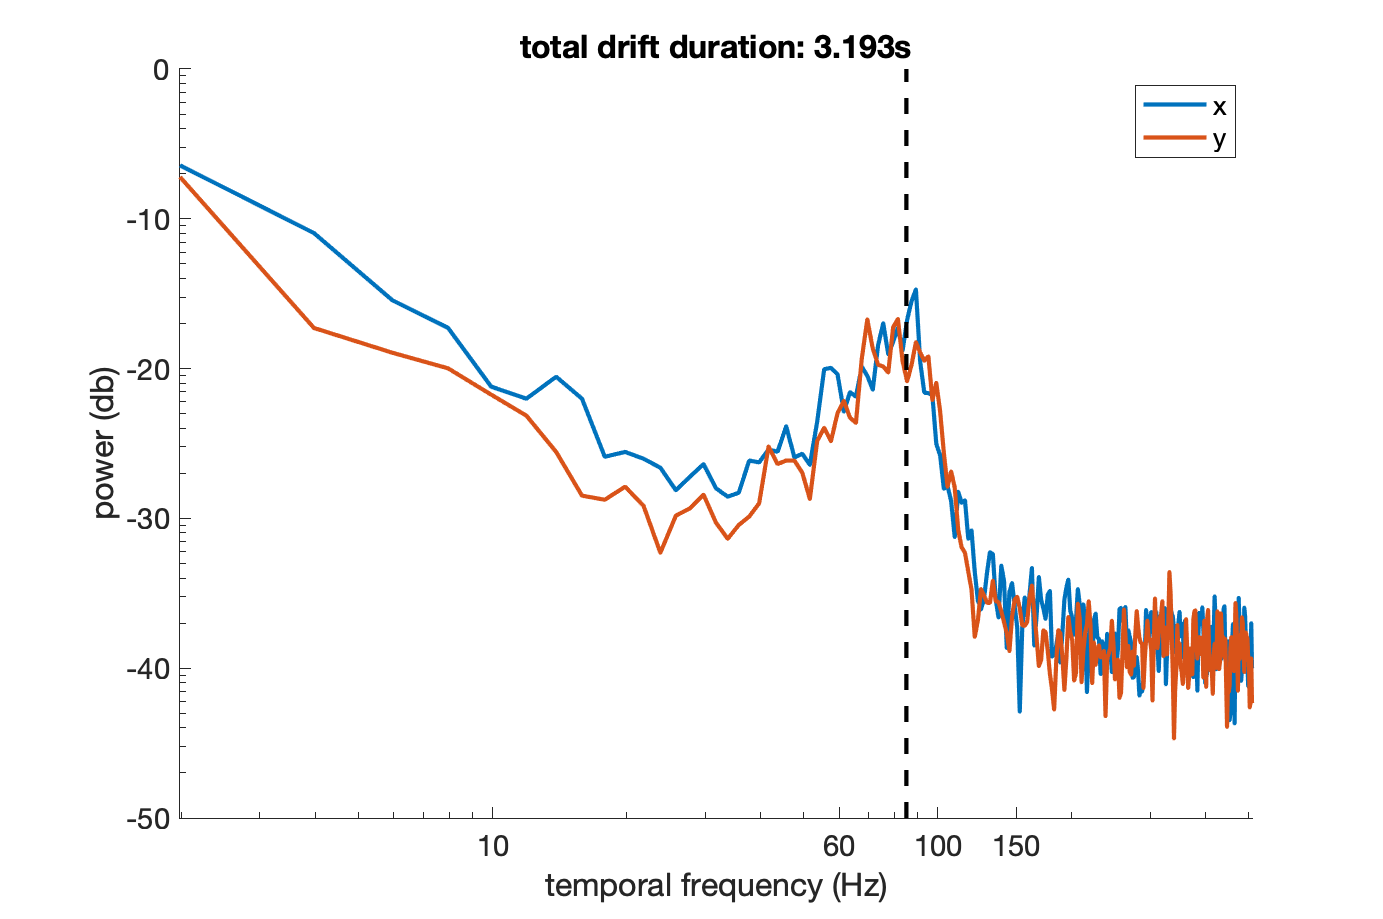
Spectrum of Drift
There is an 85Hz oscillation in the eye traces. Ruei says this is tremor.
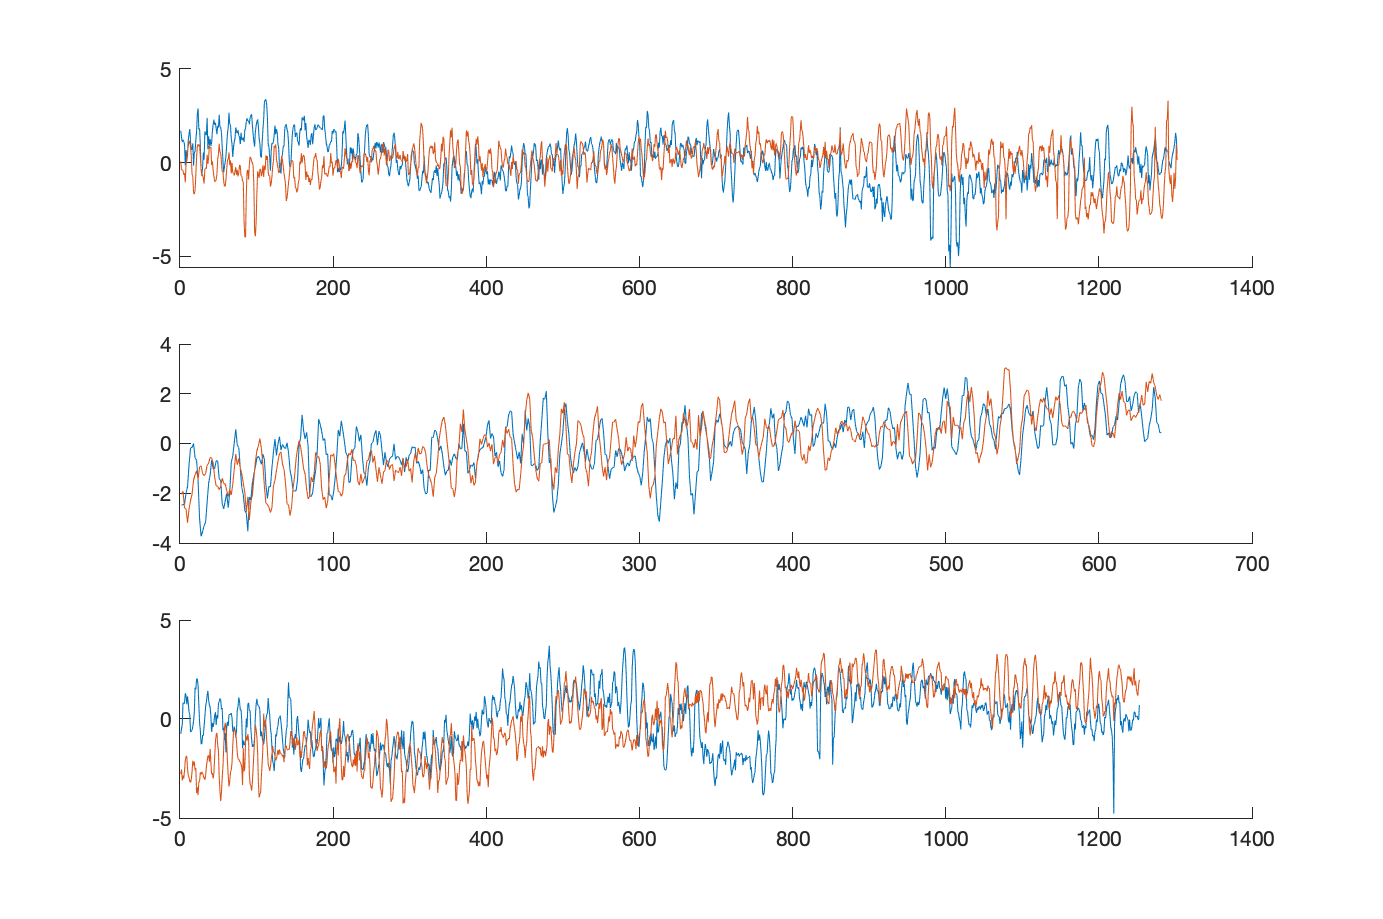
Ruei and Janis managed to record eye traces through Eyeris on a Free View task designed by Janis with Autocalibration only. Tracking quality was low but the full pipeline worked.
Data: https://rochester.box.com/s/g1u6g1au0sczkkbjaa0rf0if4gwjehui
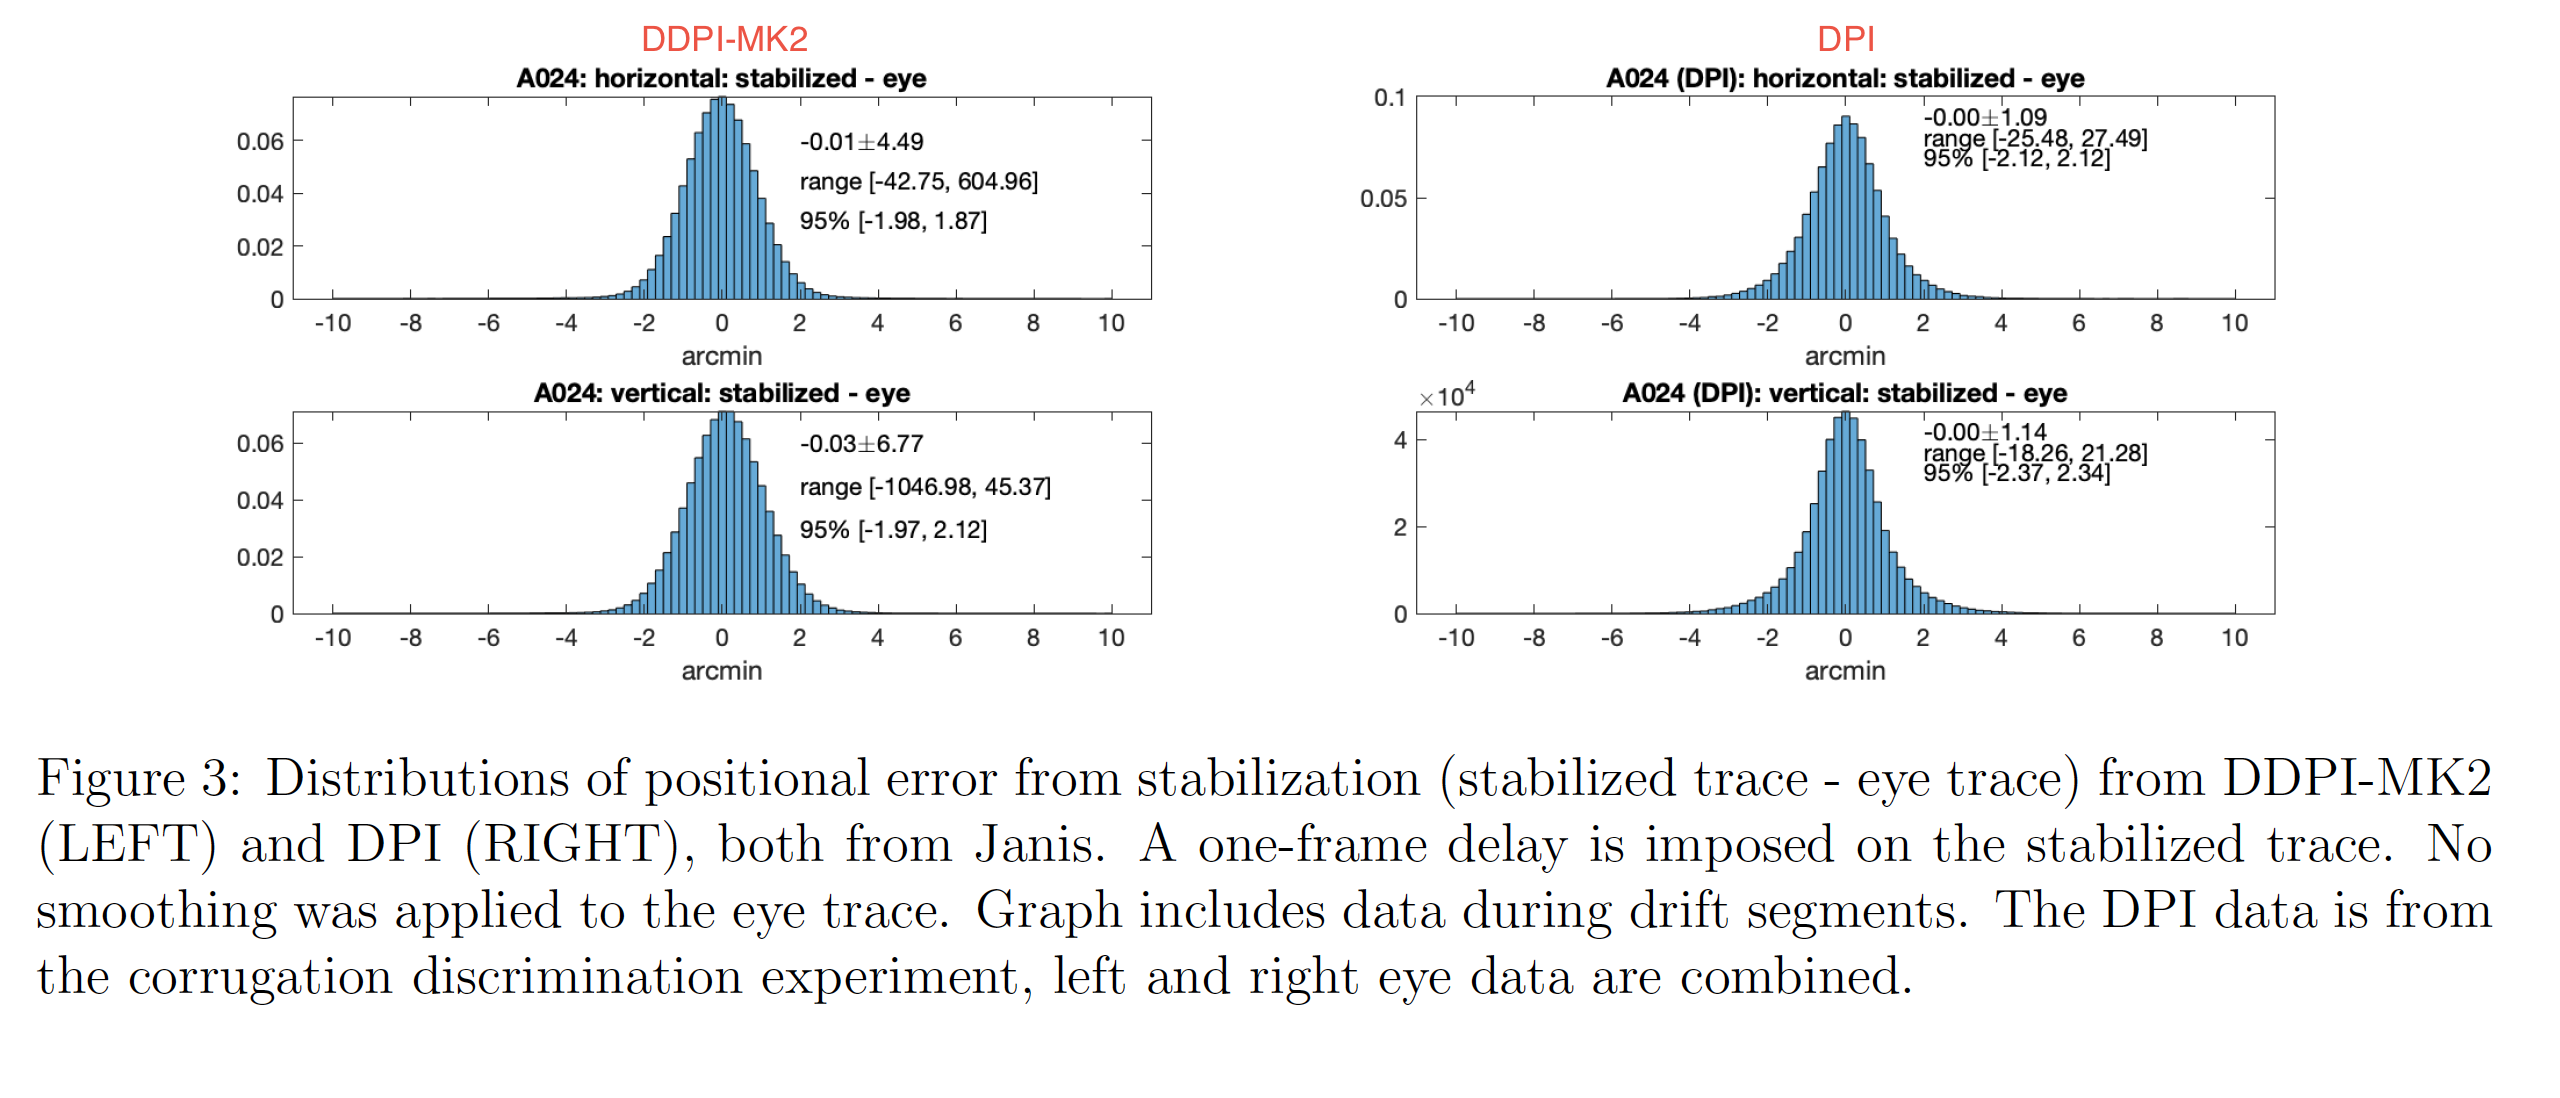
Stabilization Error Distribution
Excerpt from contrast sensitivity mapping report on December 11, 2020:
Hardware
Testing
Stereoscope
When setting up artificial eyes to match subject's IPD, you find the position of the outer edge of each carrier via (IPD + 25) / 2 +/- 150.
IPD (mm) |
Right Carrier Outer Edge (mm) |
Left Carrier Outer Edge (mm) |
55.0 |
190.0 |
110.0 |
60.0 |
192.5 |
107.5 |
65.0 |
195.0 |
105.0 |
70.0 |
197.5 |
102.5 |
Instructions for setting up the stereoscope (reference the picture below):
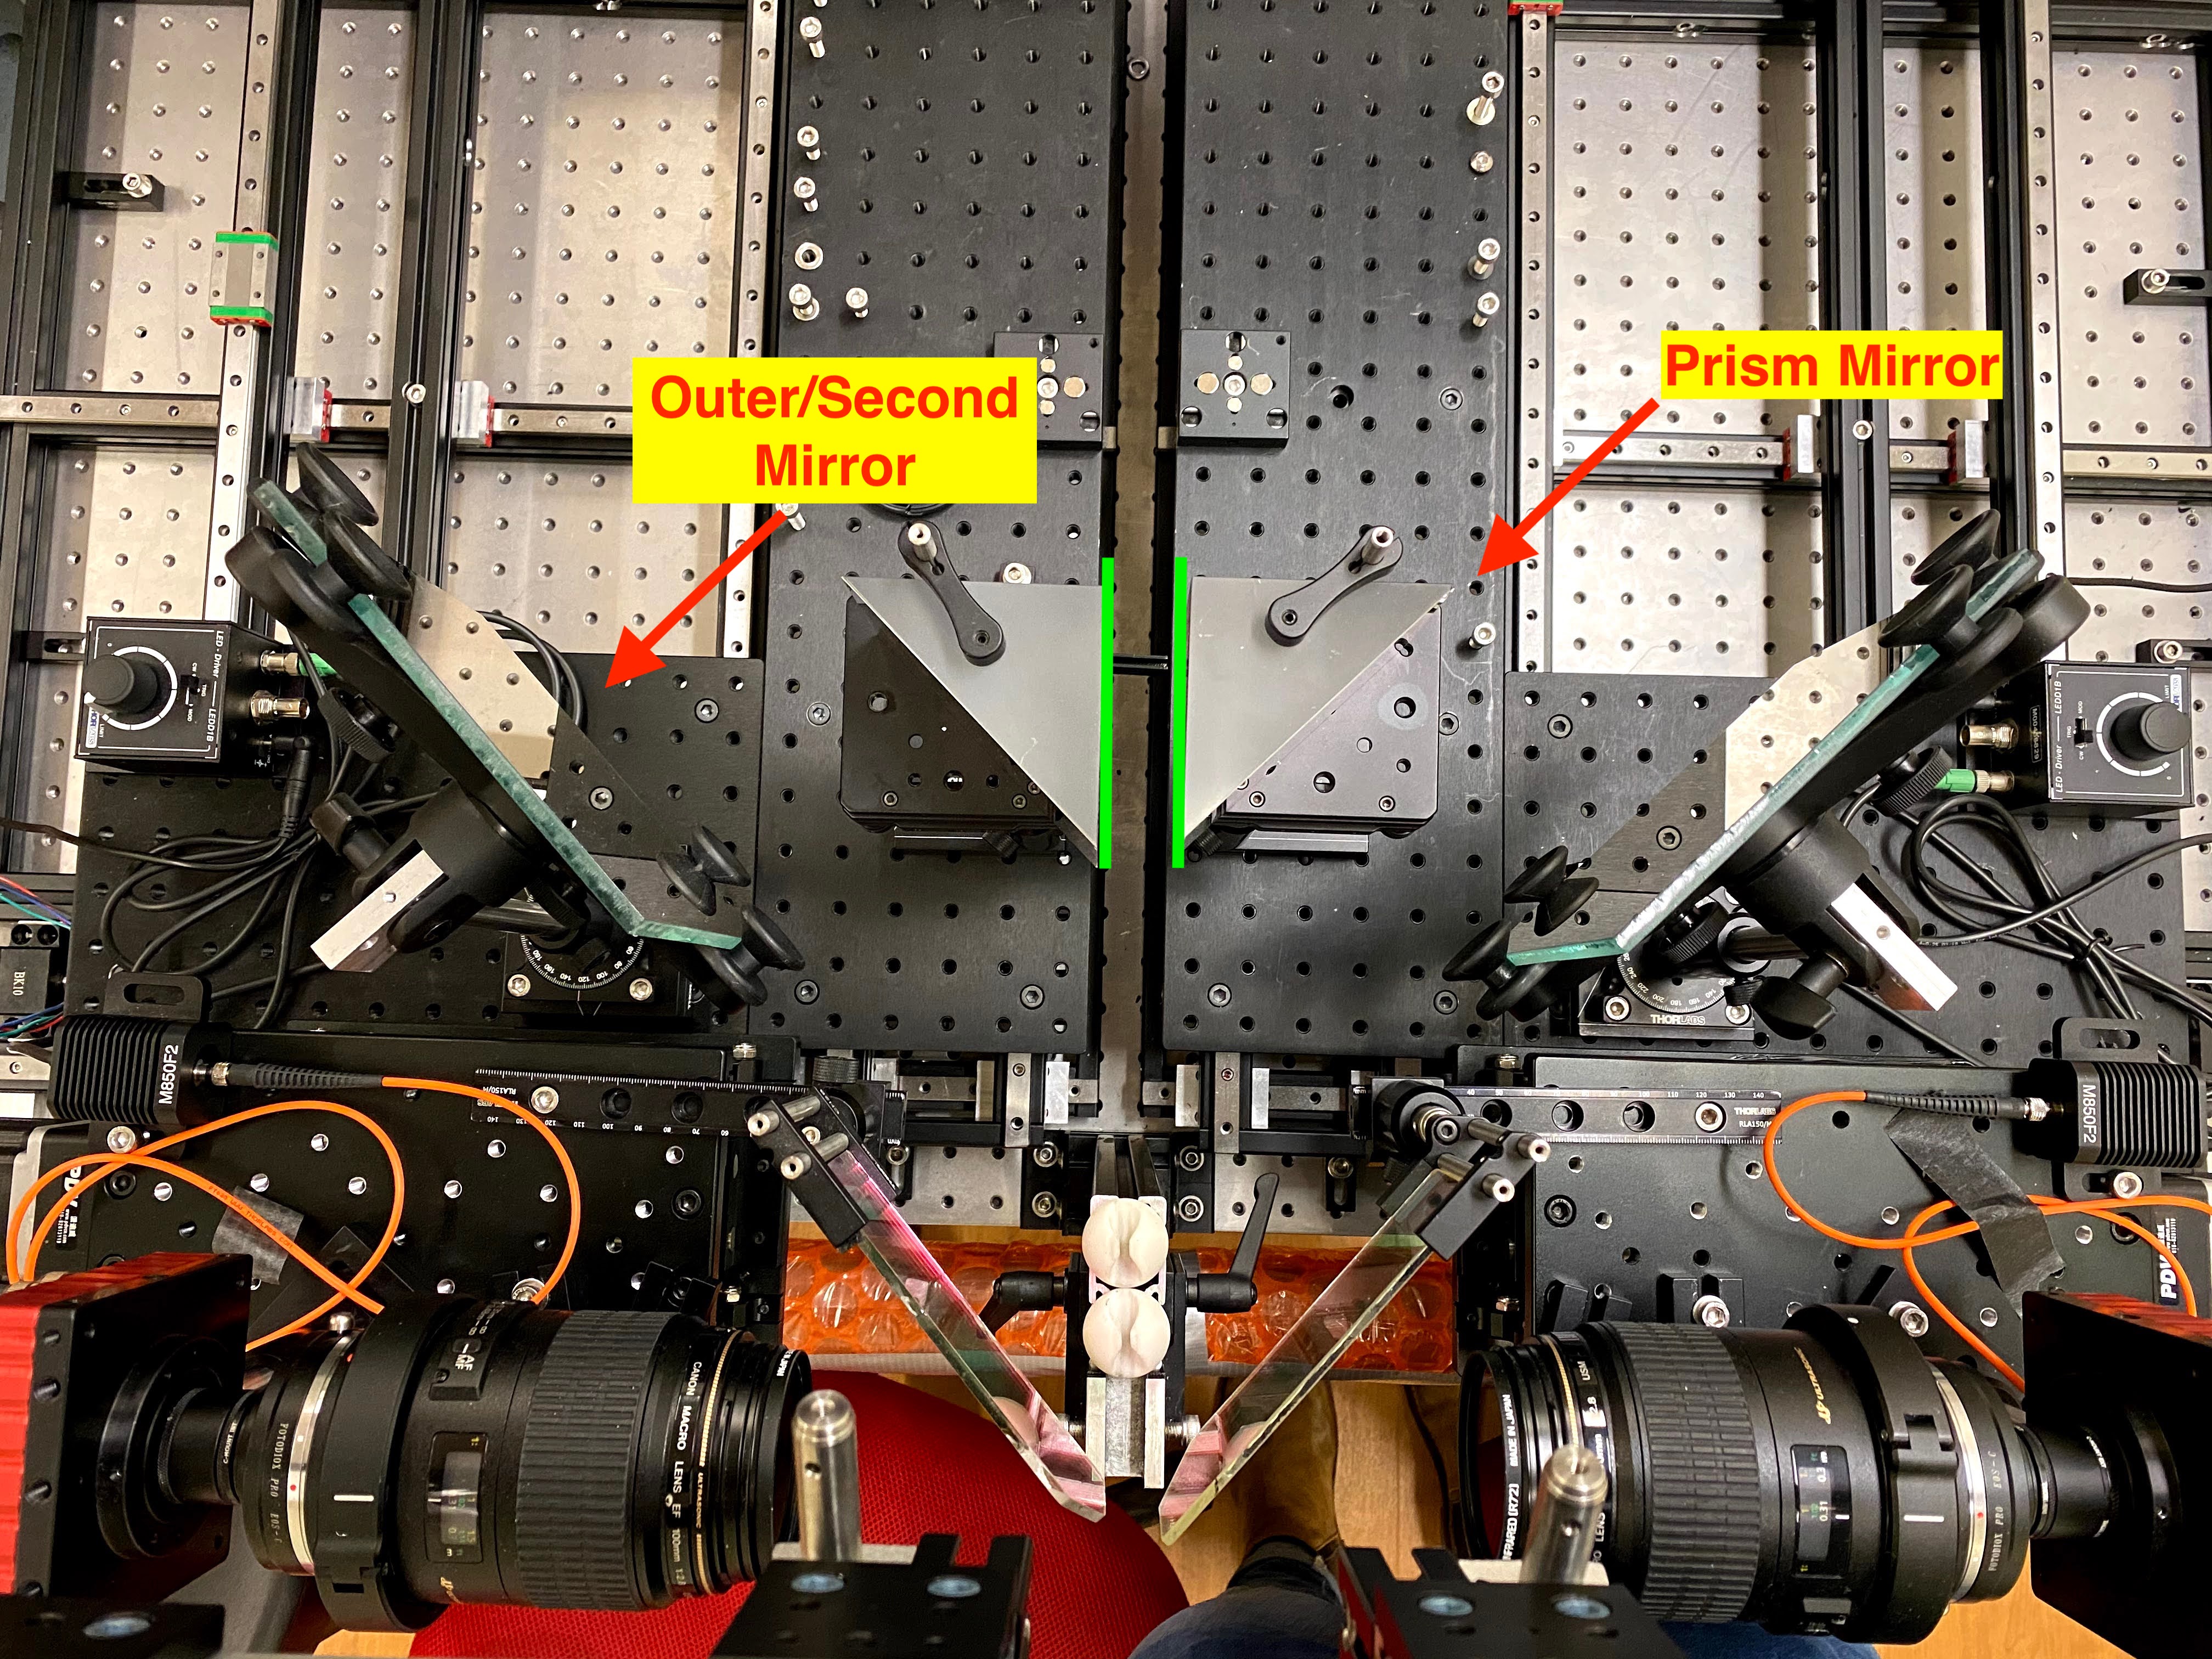
1. Bring the stages as close together as possible.
2. Place the prism mirrors and outer mirrors at the locations shown in the image. The prisms mirrors are labeled "SR" and "SL" for your convenience, which refers to subject right and subject left, respectively. Note: for the outer mirrors, you want to arrange them such that the subject cannot see the black circular pieces of the holder.
3. The prism mirrors are the part of the stereoscope that is most susceptible to misalignment. Use a stool to get a birds-eye view of the prisms, and make sure that the inner edges of the prisms are parallel with the stages (the green lines in the photo above).
4. Place a septum in between the dichroic mirrors, as well as cardboard flankers behind the prism mirrors.
5. Display dichoptic stimuli to the subject. Allow them to align the stereoscope until they can fuse the stimuli into one image. The subjects can reach over and rotate the outer mirrors to do this. They may notice that there is a vertical offset to the image. To adjust this, instruct the subject to rotate the knobs located underneath either prism mirror.
6. To ensure that the subject can only see the correct stimulus, have them hold one eye open at a time and ask if they can see the entire corresponding half of the monitor. If any portion of the monitor is obstructed, ask the subject to rotate the outer mirror(s) until they can get the entire half of the monitor into view. Due to the current constraints of the stereoscope, it's possible that a portion of the monitor will be cut off. Determining whether or not this is problematic depends on your experimental design.
7. Then, with the subject holding one eye open at a time still, ask them to look to the opposite half of the monitor and ask them if they can see anything. They should respond no if the septum is correctly placed as it will obstruct the line of the sight between the two eyes.
